All content copyright Katrina Hall 2008 through 2025

Thursday, February 26, 2009

cornmeal cookies & strawberries


I have been intrigued with the idea of a crisp, slightly sandy , cornmeal cookie for serving with fresh fruit. It sounded like the perfect pairing, avoiding the mushiness that biscuit or cake shortcakes can develop when covered with juicy fruits. So I tinkered with my original Let Me Call You Sweetheart shortcakes recipe, simply by adding a little cornmeal and more nutmeg and salt. Lovely! The cookies hold up very well with the berries, but are excellent on their own. I could see this being served with everything from pudding to fruit salad. Wherever you might serve biscotti, you could substitute the cornmeal cookie.
Here, I rolled it out thickly, baked for a short time, then carefully split the cooled cookies. You can make the cookies any shape - stars, hearts, rounds, squares. And, if you're not pleased with the shapes, you can crumble them into a bowl and top with berries and whipped cream - sort of an Eton Mess.
To make:
Preheat oven to 350F.
1 1/4 cups King Arthur flour
1/2 cup cornmeal
1 heaping t. baking powder
1/8 t. salt
1/8 t. nutmeg, or 7 scrapings on a grater
6 T. cold, unsalted butter, cut into small cubes
3 t. sugar
1/2 cup milk
sugar for sprinkling
Line a baking sheet with foil or parchment.
In mixer bowl, add flour, cornmeal, salt, nutmeg, sugar, baking powder and mix.
Add the butter and mix until butter is incorporated and looks crumbly.
Add the milk and mix until dough forms a ball.
Knead dough, then roll out on a counter dusted with flour to 1/2 " ( you could go anywhere from 1/4 of an inch to 1/2 an inch). This dough is forgiving - you can re-roll without it getting tough.
Cut out the shapes you wish. The cookies can be placed closely, since they don't spread.
Sprinkle the cookies with sugar, and bake for 25 minutes.
Remove to cooling rack.
To serve with strawberries:
fresh strawberries
freshly squeezed orange juice
sugar
Slice the berries into a bowl. Mash slightly with a masher, then add a little orange juice. Sprinkle with a little sugar and let sit at room temperature for an hour.
Serve on cornmeal cookies with softly whipped cream.
Featured in TasteSpotting!


Monday, February 23, 2009

blackout chili


Just as I was starting to make this chili last night, the house went dark. When the power didn't come back on after close to an hour, you could hear a collective groan from the region, which was hit hard in the December ice storm.
I grabbed a flashlight and went upstairs to get some more blankets, threw them on the bed as best I could in the dark, pulled on my sweatpants and a turtleneck - and went to bed.
This morning, with heat, power, and a sunnier disposition I went to work on what I was now calling Blackout Chili.
It's a colorful chili, made with red or yellow sweet peppers, chicken ( leftovers are fine, otherwise just poach a chicken breast or two and cut into chunks), red and black beans, and a nice broth fragrant with cumin and chiles, rosemary and basil. Often served with a crumble of goat cheese and parsley, you can just as easily serve plain or with scoops of Uncle Ben's - or the traditional shredded cheese and sour cream.
To make:
A large, heavy bottomed pot
4 T. olive or vegetable oil
1 onion, large dice
1 yellow or red pepper, seeded and sliced
2 stalks celery, sliced
4 fat cloves garlic, pressed
1 T. or more cumin
2 t. chili powder
1. t oregano
large pinch red pepper flakes
1 t. or more basil
a few sprigs of fresh rosemary
1 large can black beans, drained
1 large can red beans, drained
2 cups diced canned tomatoes with juice
1 can chicken stock
1-2 cups cubed cooked chicken
1-2 t. Worcestershire sauce
2 T. butter ( optional)
Hot sauce ( optional)
Heat the oil in the pot.
Add the peppers , celery and onion and saute. A little scorching is fine.
Add the garlic, cumin, red pepper flakes, chili powder. Stir well.
Add the beans, chicken stock, tomatoes, oregano, basil, butter, chicken, and rosemary to the pot.
Add the Worcestershire sauce.
Add water to about two inches or so above the chili and turn heat to simmer. Cover pot and check every once in a while, making sure there's enough liquid and the chili isn't burning.
Cook for about 45 minutes.
Taste carefully before serving - it often needs salt, pepper, hot sauce, basil, and cumin.
Serve with rice or crumbled goat cheese, or the traditional cheese and sour cream.
Enjoy - and Happy almost Mardi Gras!

Saturday, February 21, 2009

kale and pepperoni pocket pies ( calzones)


If you pack a lunch for yourself or the kids, this is a great alternative to the same old, same old sandwich - and it's less messy. It works for parties and get togethers, as well as picnics, too. We used to call these calzones "pocket pies", because they're so portable. I use lots of fresh kale, chunks of pepperoni or linguica, fresh rosemary and garlic, wrapped in a tender olive oil and herb crust. You can add cheese or not. They're up and ready in about 2 hours - and yes, they are freezable. The recipe below makes 8 pocket pies.
To make the dough:
4 cups King Arthur flour
1/2 t. kosher salt
1 package dry yeast ( 1 T.)
1 1/2-2 cups warm water ( this depends on the flour you use and the humidity - it should form a ball)
2 T. olive oil
2. t chopped fresh rosemary
Place yeast in warm water to dissolve.
Measure flour, salt and rosemary into food processor or mixer bowl.
When yeast is foamy, add the olive oil. Stir and pour over flour.
Process until the dough forms a ball. If it's too dry, add a little more water, one tablespoon at a time.
Place dough in lightly oiled bowl, cover with plastic wrap, and let rise until doubled. I put mine in a slightly warmed oven. Make sure the oven is OFF before you put the dough in, though.
Meanwhile, you can prepare the filling.
4 cups chopped kale, stems discarded
2 t. olive oil and 2 T. butter ( optional - you can use all olive oil)
2 large garlic cloves, pressed or minced
2 cups pepperoni chunks or linguica
2 t. fresh rosemary, chopped
salt and lots of freshly ground pepper
sliced or shredded cheese - I use slices of mozzarella or swiss.
Place all the filling ingredients in a pot or large skillet - except for the cheese.
Blanch the kale mixture briefly by adding about a half cup of water to skillet and bringing to a simmer. Cover and cook about 7 minutes, then stir and drain well.
When dough has risen, form into a ball and cut into 8 equal pieces.
Turn oven to 375F.
Roll each dough piece into an 8" circle.
Place about 2 tablespoons of the mixture on half the circle. Moisten the edges with water, then fold over into a semicircle.
Using a fork, seal turnover well.
Place calzones on a baking sheet .
Brush with a beaten egg, if you want a golden finish on the calzones.
Bake for 25 minutes, then remove to a cooling rack.
Dig in and enjoy!

Thursday, February 19, 2009

panna cotta- new england style


Believe it or not, this is my first time making panna cotta. I had been tempted last summer, when it seemed every food blogger was making it. But when my neighbor gave me an unusual recipe, I knew I had to try it.
Although Regina is Swiss-born, she lived in Italy for years, so I assume she knows real panna cotta. I love her New England take on this - made with maple syrup. I used three different toppings that seem to reflect February in New Hampshire - wild honey, a peach confit my sister made, and a pear and ginger marmalade. You can, of course, use fresh berries as well.
The preparation is easy - Regina says she often makes this for parties of 50 or 60 in under an hour. This recipe made 4 large servings, using 1 cup measures.
You will need:
1 cup heavy cream
1/3 cup maple syrup
3 T. cold water
1 packet powdered gelatin
1 3/4 cups buttermilk
1/8 t. salt
Place cream, maple syrup and salt in a medium saucepan and warm over medium heat.
Place the cold water in a bowl and sprinkle the gelatin over it. Let sit 5 minutes.
Mix the gelatin into the warmed cream mixture, stirring well.
Stir in the buttermilk and salt, stirring well.
Ladle into glasses, plastic dessert cups, or ramekins.
Cover loosely with plastic wrap and place in fridge for at least 3 hours.
To unmold, run a knife tip around the edges of the cup, and dip the lower part of the ramekin into warm water for a minute or so. Unmold onto plate and serve with fresh berries or honey or confit of your choice.
Enjoy!

Monday, February 16, 2009

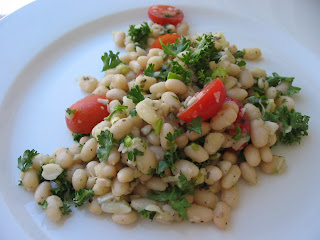
tuscan bean salad


I hope everyone had a happy and delicious Valentine's Day! After all that chocolate, I was ready to make this salad today - white beans with garlic, parsley, herbs, and grape tomatoes, or sun dried tomatoes, if you prefer a chewier texture.
I made this salad for years for the local stores around here, and I still have people asking when and if I'll start up again. I'm not sure I want to commit to that, so I'll just direct people to this page. It's a wonderful salad to pack for lunch at the office, or a picnic, or even for school.
To make:
2 cups small white beans, dried
4 bay leaves
1 peeled onion, intact
1 t. oregano
Pick through the beans and discard any pebbles. Place in a large pot with the bay leaves, onion and oregano and cover with water - about 6 inches of water above the beans. Bring to a boil and simmer, covered, for about an hour. Keep tasting the beans to make sure they're not getting mushy. When they are just soft, strain and discard the bay leaves and onion.
Place cooked beans in a large bowl.
Add:
1 T. fresh lemon juice
4 T. or more red wine vinegar
4 T. or more olive oil
4 cloves mashed garlic
3/4 cup scallions, sliced
1/2 cup fresh parsley, chopped
salt and pepper ( freshly ground)
1 t. basil, dry, or 2 T. fresh, chopped
1 t. oregano, dry
1/2 t. thyme
1 cup grape tomatoes, halved, or 7 sun dried tomatoes, snipped with scissors
Toss together and taste, taste, taste. Taste right away, and taste again a half hour later, since the seasonings are absorbed by the white beans.
You can eat this as is, or stuff into peppers, wraps, or omelets or pasta. It's also great as a party dish with tortilla chips.....I'm sure you'll be able to come with some great ideas on your own.
Enjoy!

Friday, February 13, 2009

the reine de saba chocolate cake


Yesterday I decided to make the classic Reine de Saba chocolate torte/cake from Julia's French Chef cookbook. Why? Valentine's Day, of course! As an early valentine, I spent today giving away pieces of it to everyone I met - except for that little Coquette above. Endearing as her face is, I know chocolate can be fatal to dogs, so I gave her an extra biscuit.
I love Reine de Saba ! It's a dense, one layer chocolate and almond cake, easy to make, and simply delicious with a rich chocolate ganache icing with a hint of Grand Marnier. It's beautiful as it is, or served with fresh raspberries and even a small spoonful of whipped cream, if you want to jazz it up.
To make:
The cake:
You will need one 8" x 1 1/2" cake pan, buttered and floured
Preheat oven to 350F.
4 ounces German's Sweet chocolate bar, broken into pieces
1 T. Grand Marnier liqueur
1 T. cold water
If you prefer, you can use 2 T. dark rum instead of the Grand Marnier and water.
In a microwave safe bowl, place the chocolate, water, and Grand Marnier. Microwave two minutes, or until chocolate is melted. Stir well and set aside.
1 stick unsalted butter, softened
3 large eggs, separated
2/3 cup sugar
pinch of salt
additional 2T. sugar for the whites
1/2 cup pluverized blanched almonds
1/2 t. vanilla
3/4 cup King Arthur flour, sifted twice
Whip egg whites in mixer bowl. When soft peaks form, slowly add the 2 T. sugar and whip until stiff. Scoop out into a bowl and set aside.
Using the same bowl, mix the butter and sugar until creamy and fluffy. Beat in the egg yolks, one at a time. Add the pinch of salt.
Stir in the warm melted chocolate. ( If it's cooled, just quickly microwave to soften)
Stir in the almond meal, vanilla, and flour.
Using a stiff rubber spatula, fold 1/3 of the whites into the cake batter. Slowly continue to fold in the stiff egg whites until batter is smooth and whites are incorporated.
Turn into the prepared cake pan and smooth top.
Bake for 25 minutes and remove to cooling rack. Let cool ten minutes, then turn onto another cooling rack.
The Chocolate Icing:
8 ounces semi-sweet chocolate bits, or chocolate bar, broken up
3/4 cup light cream
2 T. sieved warm apricot jam
Heat 4 T. apricot preserves in small pan. Using a fine sieve, strain the jam into a small bowl.
Add the chocolate bits.
Bring the cream to a boil and pour over the jam and chocolate.
Stir until chocolate has melted.
Pour icing on cake and smooth, if necessary.
Enjoy - and Happy Valentine's Day!

Featured in TasteSpotting!

Thursday, February 12, 2009

leek and potato with slivered ham


Checking the freezer the other day, I came across that nice Christmas hambone and decided to make a "beefier" leek and potato soup than I usually do. Normally, I puree the soup and top it with scallions -this time I added a cup of slivered, smoky ham and left it chunky. Yummy!
I served it with the last of the focaccia & herb cheese, but if I'd had time, I would have
made the rosemary bread, which would have gone well with the ham.
To make:
One ham bone, with meat
Water
bay leaf
Put the ham bone in a pot and add several inches of water - not more than half way up the bone. Add the bay leaf and simmer, covered, for 20 minutes.
Remove ham bone and slice off a cup of ham.
2 cups leek whites, sliced ( you can add one onion, if you haven't enough)
2 cups baby red potatoes, sliced thickly
1 sprig rosemary
1 t. thyme
fresh dill, about a tablespoon ( optional)
1 cup slivered ham
Simmer the leeks and potatoes, thyme and rosemary in the ham broth. Taste broth carefully and add pepper and optional dill, then the slivered ham. Do not overcook - the potatoes should be tender, but not breaking apart. It usually takes about 20 minutes cooking time.
Serve with a great rustic bread and a bright green salad.
Enjoy!

Monday, February 9, 2009

quick chocolate mousse


I have many happy memories of making this mousse for the restaurant in the quiet of the morning. It's a wonderful, creamy but light mousse that contains no butter or cream at all. And it's quick to make - you just need a few hours for it to set in the fridge. So if you haven't got time to make a special Valentine cake, this mousse would be the perfect dessert for your honey ( or your kids, or your Mom, or...just for you).
This recipe makes about 2 1/2 cups of mousse.
To make:
3 eggs, separated
pinch of salt
4 ounces (1 bar) Ghirardelli 60% cacao bittersweet chocolate ( or Baker's sweet, but then you wouldn't add the sugar to the egg whites)
3 T. cold water
1 t. dark rum or Frangelico hazelnut liqueur
2 T. sugar, superfine
Place the egg whites in a mixer bowl. Reserve the egg yolks in a small bowl.
Break up the chocolate and place in microwave safe china bowl.
Add the water to the chocolate and microwave about 2 minutes, or until the chocolate is melted.
Carefully stir the egg yolks into the warm chocolate and stir well. Add the rum or Frangelico.
Microwave another minute and make sure all the chocolate is fully melted.
Beat the egg whites with the pinch of salt until soft peaks form. Continue beating, and slowly add the sugar to the egg whites. Beat until stiff and slightly shiny.
Fold the chocolate mixture into the egg whites carefully and gently. Continue to fold until the mousse is completely incorporated and there are no white flecks of meringue showing.
Ladle into small souffle dishes or glasses. Carefully cover the ramekins with plastic wrap and place in fridge for at least 3 hours.
Featured on TasteSpotting!

Sunday, February 8, 2009

homemade focaccia and herb cheese


Last night, I was re-reading Under the Tuscan Sun, delighting in this particular paragraph:
"Like old peasants, we could sit by the fireplace, grilling slabs of bread and oil, pour a young Chianti. After rooms of Renaissance virgins and dusty back roads from Umbertide, I cook a pan of small eels fried with garlic and sage. "
I think it's books like these that pushed me into the kitchen - it's not only food, but poems and dreams. So - last night I made Nick Malgieri's focaccia and my own herb cheese, dreaming of Tuscan fireplaces and olive trees.( I don't have an olive tree, but I do have an orange tree -see above)
To make the focaccia ( this is from The Modern Baker), and it is the best focaccia I've ever had.
4 cups King Arthur flour
2 t. salt ( and this is important! I use kosher.)
one envelope active dry yeast
1 2/3 cup warm water
3 T. olive oil
extra olive oil for the pan and for drizzling
one jellyroll pan, generously oiled
Combine the flour and salt in a bowl.
Whisk yeast into warm water in a small bowl, then whisk in the olive oil.
Make a well in the flour and pour in the yeast/oil mixture.
Using a circular motion with a strong spoon, mix the dough until all the dry bits have been incorporated.
Cover the bowl with plastic wrap and place in a warm place - on top of the fridge, or in an oven that has been turned on for a few minutes, then off. Make sure the oven is off and warm, not hot.
Let dough rise to double. Scrape dough into oiled pan and pat out to fill the pan. Let rise for another 40 minutes or so.
Dimple the dough with your fingertips, drizzle olive oil ( about 2 T.) , plus herbs if you wish, on top of the dough. Bake at 400F for about 25 minutes, or until golden brown.
Remove the focaccia from the pan with a large spatula, and place on cooling rack.
The herb cheese:
Tangy, silky, and the best ever topping for sandwiches - especially roast beef or turkey sandwiches. It works on baked potatoes, mashed potatoes, with raw veggies for crudites and/or a dip - delicious!
To make:
8 oz. softened cream cheese
1 stick softened unsalted butter
1 T. fresh lemon juice
1 t. Worcestershire sauce
1/2 t. dijon mustard
1-2 T. fresh parsley, minced
1 T. fresh chives, minced, or finely chopped green scallion tops
2 garlic cloves, pressed
SALT to taste
freshly cracked pepper
1 T. dried tarragon
In mixer bowl or by hand, mix ingredients together until thoroughly blended. Taste! I often need to add more salt. Pack in containers and place in fridge until needed.
Enjoy!
Featured in Photograzing!

Wednesday, February 4, 2009

earthy and delicious : Hunter's Chicken


The other day was cold and snowy, and I was wanting something filling and warm. Something with a little wine, would be nice, I thought. And chicken - not beef. Then I remembered the Chicken Chasseur I used to make in the restaurant and looked it up in Craig Claiborne's New York Times Cookbook. There it was, but as I read the ingredients, I was puzzled. The combination of braised chicken, wine, and herbs with mushrooms and tomatoes are also known as Hunter's Chicken - I had no idea the two recipes were the same. Whatever the name, this dish is just mouthwateringly tender, heady with herbs and wine, and has a wonderful complex, earthy flavor. It's also budget friendly - a big plus these days!
The recipe is an old classic, dating back to castles and hunting parties, and if you happened to be a bad shot, your birds could still be used in this casserole even if they were a little ragged. Luckily, I can just pop into the supermarket and pick up bone in chicken thighs.
To make:
You will need a heavy bottomed largeish saucepan.
4 chicken thighs, bone in, but skin pulled off
2 T. olive oil ( or unsalted butter)
salt and pepper
1 t. thyme
1/2 cup minced onions or 3 large shallots, minced
1 cup sliced mushrooms
1/2 cup dry white wine, or dry vermouth. If you don't use alcohol, you can use rice vinegar or herb vinegar
1/2 t. tarragon
2 T. chopped parsley
3/4 cup canned plum tomatoes, with juice, diced
Rinse and pat the chicken thighs dry. Heat the oil and sprinkle the thighs with the salt, pepper, and thyme, then place in pot and brown on all sides.
Add the shallots or onions, mushrooms, white wine or vermouth, tomatoes, and herbs. Cover the pot and simmer until the chicken is very tender - about 30 minutes. Stir and taste and add more salt or pepper if needed. This serves four.
Serve with rice , noodles, or potatoes.
Enjoy!

Sunday, February 1, 2009

candy cane marshmallows


I have been staring at this glass of candy canes since Christmas. It sits over the sink, so I'm reminded several times a day to DO something with them - no cook likes to waste something as pretty as candy canes.
Pink has been on my mind the last few days - wrapping birthday presents for a 3 year old in large amounts of pink tissue ( her favorite color) . Last night I suddenly thought: pink, marshmallow, pink, marshmallows - OH - PINK MARSHMALLOWS! It only used up three candy canes, though, so I still need to find another recipe for candy canes.
This is adapted from Tyler Florence.
1 1/2 packets powdered Knox gelatin
1 cup cold water
1 cup granulated sugar
1 extra large egg white
1 cup confectioners" sugar
3 candy canes, broken up, then pulverized in a food processor.
In a small saucepan, soak the gelatin in the cold water - about 5 or 6 minutes. Stir. Add the granulated sugar and warm until the sugar has dissolved. Cool.
Prepare a pan - I used a square brownie/cake pan 8"x8". Grease pan, line with wax paper, and grease wax paper.
Beat the egg white until stiff. Beat in the cup of confectioner's sugar , then slowly pour in the cooled gelatin mixture. Beat until the mixture doubles in size and forms ribbons in the batter. Add the pulverized candy canes and beat another 15 or so minutes. (You need to have a stand mixture for this, obviously - beating time runs about 25 minutes)
Dust the pan with confectioners' sugar lightly, then pour in the marshmallow batter. Let sit for at least 3 hours or overnight, uncovered.
Gently remove marshmallow ( now wobbly, but firm) and pull away the wax paper on the sides. Using a clean knife, cut marshmallows into cubes or whatever shape you wish. If you use cookie cutters, try spraying them with Pam , or another spray cooking oil. If the knife gets sticky, simply rinse it.
Using a sieve, sprinkle confectioners' sugar on tops of marshmallows and serve in hot milk or hot chocolate with a candy cane.
Enjoy!